What are GPU Clusters?
Together GPU Clusters provide on-demand access to high-performance GPU infrastructure for training, fine-tuning, and running large-scale AI workloads. Create clusters in minutes with features like real-time scaling, persistent storage, and support for both Kubernetes and Slurm workload managers.Concepts
Kubernetes Cluster Architecture
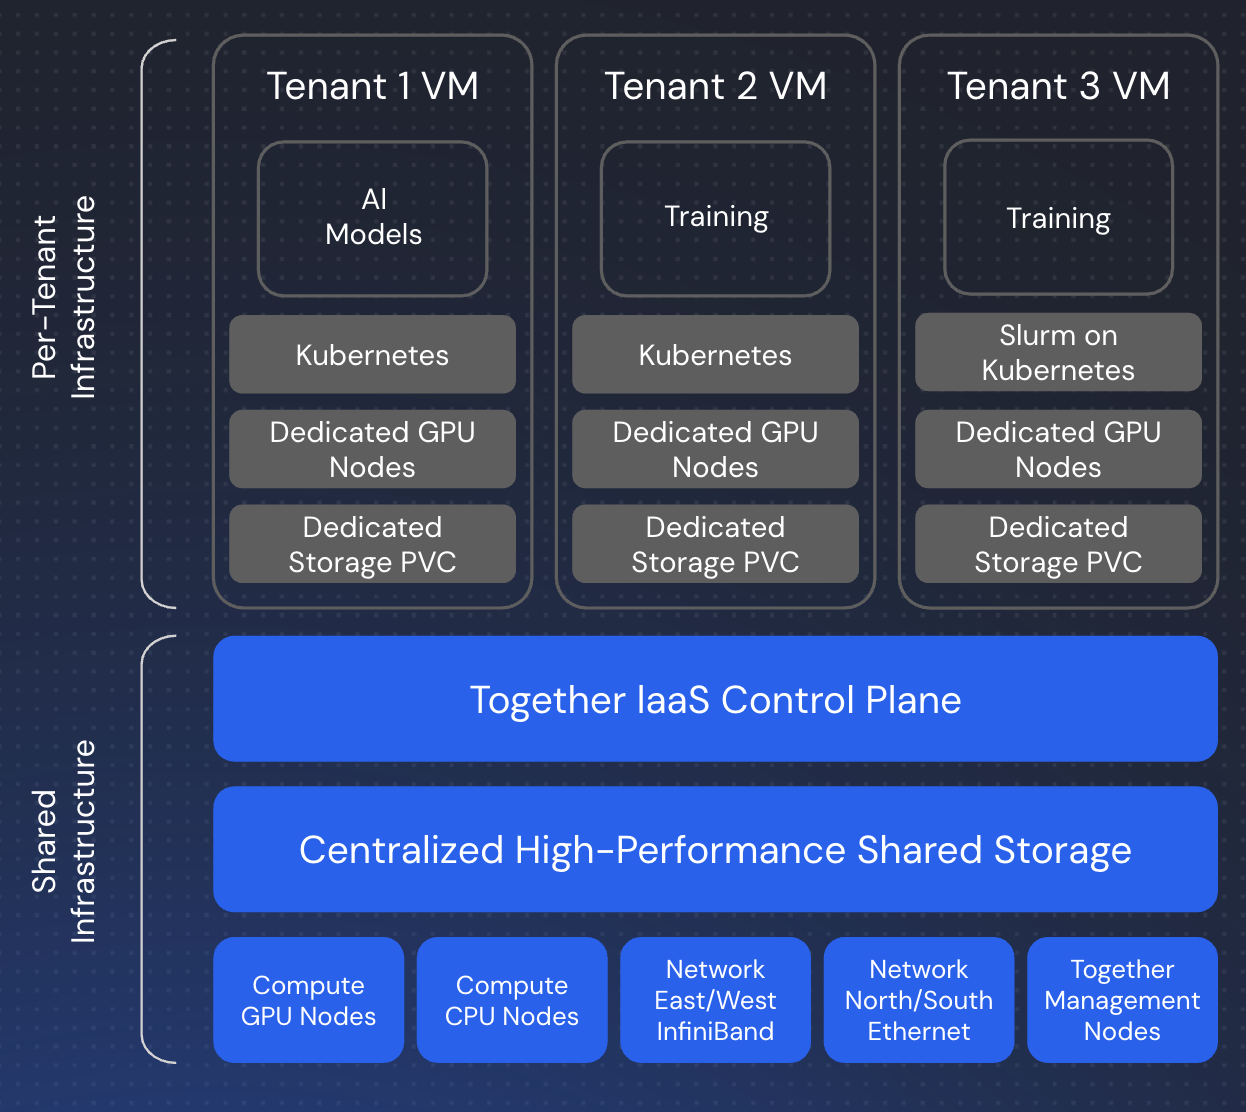
- Control Plane – Manages cluster state, scheduling, and API access
- Worker Nodes – GPU-equipped nodes that run your workloads
- Networking – High-speed InfiniBand for multi-node communication
- Storage Layer – Persistent volumes, local NVMe, and shared storage
kubectl, or through higher-level abstractions like Slurm.
Slurm on Kubernetes via Slinky
For users preferring HPC-style workflows, Together runs Slurm on top of Kubernetes using Slinky, an integration layer that bridges traditional HPC scheduling with cloud-native infrastructure:- Slurm Controller – Runs as Kubernetes pods, managing job queues and scheduling
- Login Nodes – SSH-accessible entry points for job submission
- Compute Nodes – GPU workers registered with both Kubernetes and Slurm
sbatch and srun commands while leveraging Kubernetes’ reliability, scalability, and ecosystem.
Key Features
- Fast provisioning – Clusters ready in minutes, not hours or days
- Flexible scaling – Scale up or down in real time to match workload demands
- Persistent storage – Long-lived, resizable shared storage with high throughput
- Multiple workload managers – Choose between Kubernetes or Slurm-on-Kubernetes
- Full API access – Manage clusters via REST API or CLI
- Enterprise integration – Works with SkyPilot and other orchestration tools
Available Hardware
Choose from the latest NVIDIA GPU configurations:- NVIDIA HGX B200 – Latest generation for maximum performance
- NVIDIA HGX H200 – Enhanced memory for large models
- NVIDIA HGX H100 SXM – High-bandwidth training and inference
Capacity Options
GPU Clusters offer two billing modes to match different workload patterns and budget requirements. You can choose Reserved capacity for predictable, sustained workloads with cost savings, or On-demand capacity for flexible, pay-as-you-go usage.Reserved Capacity
Reserve GPU capacity upfront for a commitment period of 1-90 days at discounted rates. How It Works:- Upfront payment – Credits are charged or deducted when the cluster is provisioned
- Fixed duration – Reserve capacity for 1 to 90 days
- Discounted pricing – Lower rates compared to on-demand
- Automatic decommission – Clusters are decommissioned when the reservation expires
- Extend as needed – Users can extend their reservations from the cloud console cluster details page by clicking the “Extend Duration” button
- Predictable workloads where you know the duration
- Multi-day training runs or experiments
- Cost optimization with discounted rates
- Planned workloads with specific commitments
On-demand Capacity
Pay only for what you use with hourly billing and no upfront commitment. How It Works:- Hourly billing – Pay per hour of cluster runtime
- No commitment – Terminate anytime without penalty
- Flexible – Scale up and down as needed
- Standard pricing – Higher per-hour rates than reserved capacity
- Variable or unpredictable resource needs
- Short-term experiments or development work
- Exploratory testing before committing to longer runs
- Temporary capacity needs beyond reserved baseline
Mixing Capacity Types
You can combine reserved and on-demand capacity in the same cluster for optimal cost and flexibility:- Start with reserved capacity for your baseline workload (e.g., reserve 8xH100 for 30 days)
- Add on-demand capacity during peak periods (e.g., scale to 16xH100 temporarily)
- Scale back down when burst period ends – on-demand capacity is removed, reserved capacity remains
Choosing the Right Type
Choose Reserved if:- ✓ You know the duration of your workload
- ✓ You’re running multi-day training or experiments
- ✓ Cost optimization is important
- ✓ You can commit to a specific period
- ✓ Your resource needs are unpredictable
- ✓ You’re running short experiments
- ✓ You need maximum flexibility
- ✓ You’re in development/testing phase
- ✓ You have a predictable baseline with occasional bursts
- ✓ You want cost savings on steady-state workload
- ✓ You need flexibility for peak periods
Storage
Clusters include multiple storage tiers:- Shared volumes – Persistent. High-throughput file-system that survives pod restarts, node reboots, and cluster deletion.
- Local NVMe – Ephemeral. Fast local disks on each node. Data can be lost during reboots/migrations/recreations or cluster operations.
/homedirectory – Persistent on Slurm (NFS-backed). Ephemeral on Kubernetes (local to each node).
Workload Management
Kubernetes
Use standard Kubernetes workflows withkubectl to:
- Deploy pods and jobs
- Manage persistent volumes
- Access the Kubernetes Dashboard
- Integrate with existing K8s tooling
Slurm
For HPC-style workflows, use Slurm with:- Direct SSH access to login nodes
- Familiar commands (
sbatch,srun,squeue) - Job arrays for distributed processing
- Traditional batch scheduling
Getting Started
Ready to create your first cluster?- Follow the Quickstart guide for step-by-step instructions
- Review the Capacity Options above to choose the right billing mode
- Check Pricing for current rates
Support
- Capacity unavailable? Use the “Notify Me” option to get alerts when capacity comes online
- Questions or custom requirements? Contact [email protected]